Bitcoin Miner USB kaufen
 USB AsicMiner Setup on Windows 7 or Windows 8
Here are the basic guidelines for an USB AsicMIner Block Erupter Setup for Windows 7/8. You should be hashing for BitCoins very soon following this setup. I have tested this setup myself following guidelines over at bitcointalk forums and through web research.
I have purchased several these devices through the group buy options for the purpose of bitcoin mining for the experience. I also purchased and tested USB AsicMiner Block Erupters for resale through various online merchants. Following this installation guide I was able to get my USB Block Erupters running under Windows 8. This also works for Windows 7. The screenshots below are from my Windows 8 operating system thus your gui may appear slightly different when BitCoin Mining. Here’s is how I am Bitcoin Mining on Windows 8, using CGMiner 3.1.1.
Step 1: Download and install CGMiner 3.1.1/
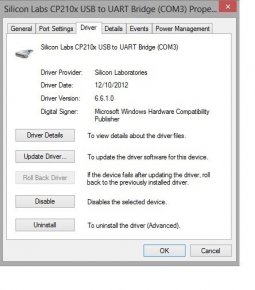
 Step 2: Download and install this driver the USB to UART Bridge VCP Drivers
Once downloaded and installed, this driver will allow you to “view” your USB ASicMiner Block Erupters from Control Panel\Hardware and Sound\Devices and Printers.
STEP 3: In order to start bitcoin mining plug in the USB AsicMiner Block Erupter.
These miners require a powered USB port/hub. If you intend to setup more than one USB Erupter, please keep in mind, the power consumption. These devices consume nearly 560 milliamps. Most likely a powered USB hub will need to be used.
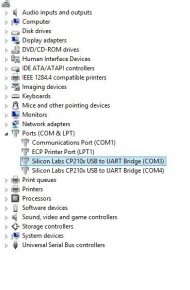
STEP 4: Make note of the COM Numbers for each USB AsicMiner Device.
- Navigate to Control Panel
- Click on Printers and Devices
- You should be able to see USB devices similar to what is listed below:
USB ASICMiner Erupters appear in the Windows 8 Device Manager (ex:)
Silicon Labs CP210x USB to UARTBridge (COM3)
Silicon Labs CP210x USB to UARTBridge (COM4)
More will appear depending on the amount of USB bitcoin mining devices you are attempting to use.
STEP 5: Create a Desktop Shortcut.
Refer to the directory that contains your cgminer 3.1.1 install, create a shortcut with a target command line that looks like this example:
C:\cgminer\cgminer-nogpu.exe -o [pool]:[port] -u [username].[worker] -p [password] –icarus-options 115200:1:1 –icarus-timing 3.0=100 -S //./COM3 -S //./COM4
The above line does not copy paste correctly. There is actually two hyphens prefixed before each of the icarus settings. For example: - -icarus-options 115200:1:1 and – -icarus-timing 3.0=100 but no spaces between each set of hyphens. My friend and I were troubleshooting his new bitcoin mining toy, and after nearly a hour we realized our copy/paste all showed one hyphen instead of two.
C:\cgminer\cgminer-nogpu.exe -o [pool]:[port] -u [username].[worker] -p [password] – -icarus-options 115200:1:1 – -icarus-timing 3.0=100 -S //./COM3 -S //./COM4
You will need to add –S //./COM(x) depending the amount of devices for your particular bitcoin mining setup.


